I’m the room parent for my oldest daughter’s class this year. Next week will be the first class party of the year and I was faced with the challenge of a Fall/Halloween-themed edible craft that both the kids would love and that I would feel good about.
Table of Contents[Hide][Show]
The standard edible craft for these parties is spreading frosting on and adding sprinkles to sugar cookies. I wasn’t going to feel good about that, even sticking with Enjoy Life Sugar Cookies and India Tree Natural-Dye Sprinkles. So, I started thinking about the more interesting edible craft projects I’ve seen, like using pretzel sticks stuck into marshmallows to make spiders (not terrible with gluten-free pretzels, I guess), half peeled bananas with chocolate chips to make ghosts, and peeled clementine oranges with celery sticks to make little pumpkins. The trouble is that the craft part of this edible craft needs to take at least 5 minutes (these are second graders), and sticking three chocolate chips into half a banana to make a ghost, while cool-looking and a healthier choice, is not a 5-minute craft.
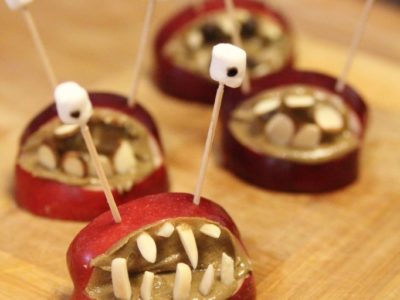
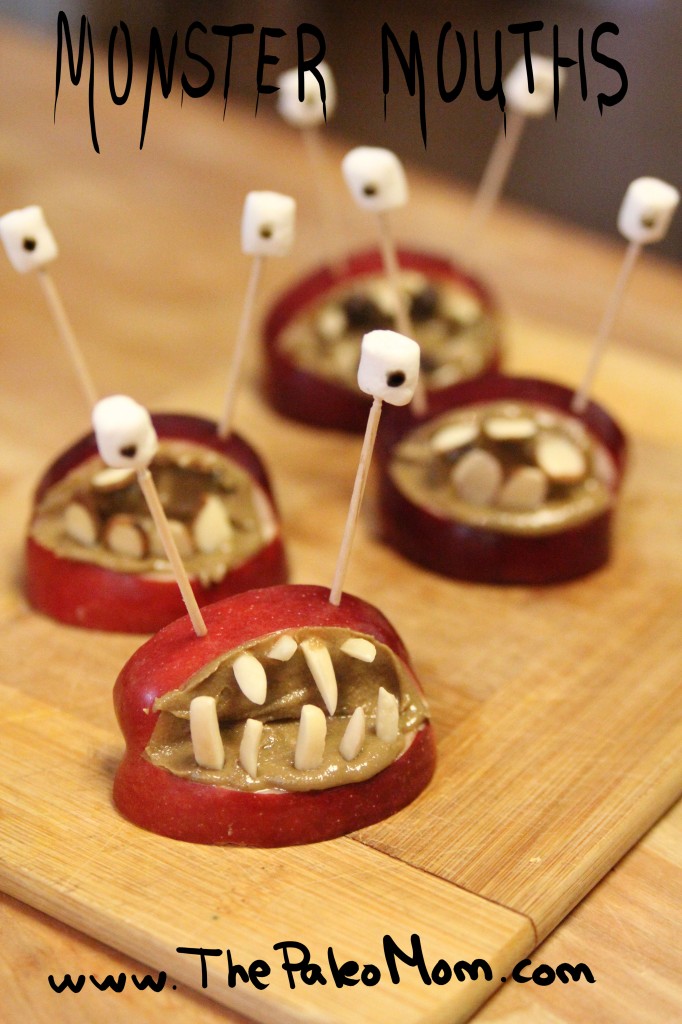
So, I started perusing the interwebs for edible craft ideas. And then, I found it! Or rather, many its, all various versions of these Monster Mouths (I have no idea who came up with the original idea). So, I tweaked it and came up with my own version that I can feel good about serving 7- and 8-year olds. The kids will have a blast making them; they’ll enjoy eating them, and these are a pretty darned healthy choice for an edible craft!!! WIN WIN WIN!
This is a fun project even for an afternoon snack. Obviously, this is a great little Halloween edible craft, but you could make these any time of year! And both my kids loved making and eating these! We had so much fun with them that I felt I just had to share the recipe here! This recipe is more of a how-to, rather than a 1/4 teaspoon of this and a pound of that type recipe, just because the variations are endless! Those of you who have followed my blog for a while know that I’m not a process shot type of person usually, but with these, it seemed the only way to really show you how to make them!
I hope you and your little ones enjoy!
Notes for nut-free schools/home: You can easily keep these Monster Mouths 100% nut-free. Pepitas, sunflower seeds, and coconut flakes all make spooky teeth too!
prep time: 5 minutes (or more if you’re having fun)
cook time: none
yield: 4 per apple
What you’ll need:
- Apples (each apple makes 4 mouths), red ones are great, but green or yellow work too!
- Sunflower Seed Butter (or your favorite Nut Butter)
- Mini marshmallows (or make your own with this Paleo-friendly recipe, or see tips below for other “eye” options like apple or grapes)
- Stuff for teeth: Sliced Almonds, Slivered Almonds, Chocolate Chips (you can also use pumpkin seeds, blanched almonds, sunflower seeds, coconut flakes, more mini marshmallows … get creative!)
- Natural Food Dye (or something like a food dye pen, although these aren’t made with natural food dyes, or see tips below for other “eye” options)
- Toothpicks
- A sharp paring knife
- A spreading knife
You really don’t need much of any ingredient, other than apples and sunflower seed butter, so feel free to make one of these a “let’s see what’s in the pantry” type projects.
The procedure:
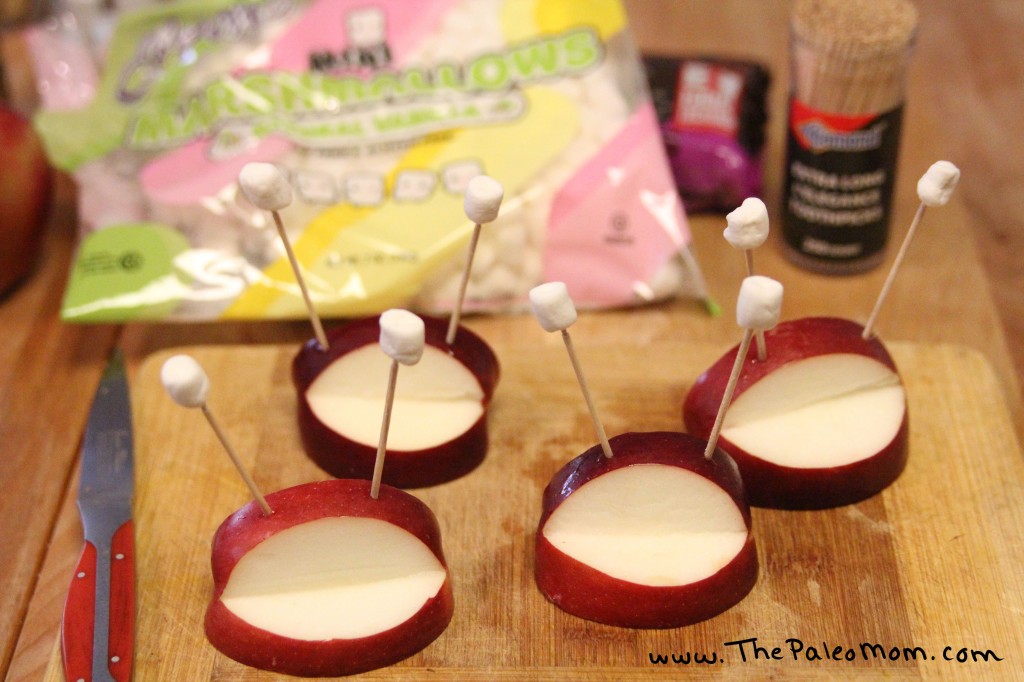
First, cut your apple(s) into quarters. Then cut the core off in a straight line.
Tip: If you have a variety of apple that browns, brush all the cut parts with lemon juice right after you cut them. Some varieties (usually the harder ones like Fuji) don’t brown as easily, so for those, lemon juice won’t be needed.
Next, cut a wedge out of the peel side of each quarter. To do this, cut parallel to your edge, about 1/2″ in, aiming for where you think your knife will meet from the other side. Then do the other side, and pry out your wedge. It looks trickier than it is. If you’re not confident in your knife skills, have an extra apple on hand, but your probably won’t need it.
Tip: This doesn’t have to be perfect. Even if it’s lopsided, it’ll make a cool monster mouth! You can pop the wedges into your mouth as you cut them out (which is what my four-year old did), or you can save them to make non-marshmallow eyes, if you want to keep this whole treat to just fruit and nuts.
Next, insert two toothpicks (or more, maybe your monster mouth has three eyes!) into one “lip”. Where the toothpick comes out at the back end will help stabilize the monster mouths and give you a nice place to stick your eyes! Stick one mini marshmallow on each toothpick for an eye. Don’t want to use marshmallows? Try grapes, or cut eye shapes out of your reserved apple wedges!
Tip: toothpicks that are pointy on both ends are easiest for skewering those mini marshmallows on, but not strictly necessary (mine were only pointy on one end and they turned out just fine!). Don’t want to use marshmallows? Try red grapes (you can cut a little wedge off to make a red grape look more like an eye), or cut eye shapes out of your reserved apple wedges! Dried fruit, like dried apricots, would also make great eyes! Or you could even glue paper circles to the toothpicks before hand for non-food eyes!
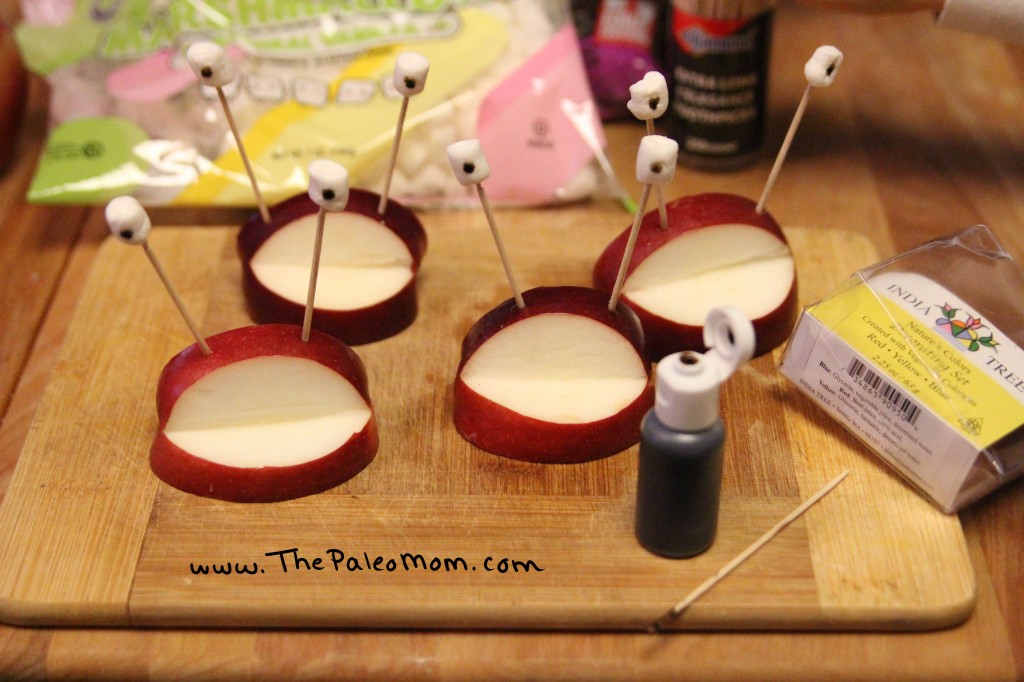
Next, paint some eyes onto your mini marshmallows using food dye!
Tip: Feel free to get as detailed as you want. Does your monster have bloodshot eyes? Is she a girl monster with long eyelashes? This is where a food dye pen gives you a lot more flexibility. But you can also just dip a toothpick into natural food dye (like I did) or use a small (clean) paintbrush.
Next, spread sunflower seed butter all over the mouth.
Tip: I found the sunflower seed butter stuck really well . But of course, different types of nut butters and different types of apples will affect how well it sticks (almond butter never sticks as well for me). Just remember, it doesn’t need to be perfect.
Next, stick in some teeth. I think slivered almonds were my favorite. Of course, my kids thought the chocolate chips looked like cavities (their excuse for wanting to use more chocolate chips; raisins would be a good spooky alternative if you want to avoid having a giant bag of chocolate chips in front of your kids). Mix and match and be creative!
 Tip: For nuts or seeds, it helps to stick the pointy end of the nut into the flesh of the apple slightly. For rounder nuts, or things like chocolate chips, the sunflower seed butter is plenty sticky enough to hold them. Another cool idea I saw in my internet research (but chose not to do with these) is to use fruit leather as a tongue!
Next, Enjoy and don’t forget some napkins!

